
Assets Tab
The Assets tab is a unified library for all your uploaded and connected files — images, video, documents, presentations, and spreadsheets — in one place.
Facet filters
Section titled “Facet filters”A row of chips at the top narrows the grid by type:
- All Assets — everything in your library
- Images and Video — files uploaded to the library (see Images and Videos for formats and limits). Animations and stickers aren’t shown here; they’re under Elements in the editor’s Add panel.
- Documents — uploaded PDFs and Word documents, plus imported Google Docs
- Presentations — uploaded PowerPoint files, plus imported Google Slides
- Spreadsheets — uploaded Excel files, plus imported Google Sheets
Click a chip to filter; click All Assets to reset. A count next to the chips shows how many items match.
Collections
Section titled “Collections”The left sidebar shows Collections — a tag-based view of your library, not a separate folder you create. Every tag on a library image or video becomes a row here automatically, with a live count; there’s no separate step to create a collection beyond tagging an asset (see Bulk Operations below, or apply a tag from an asset’s inspection panel). Documents, presentations, and spreadsheets carry no tags, so they never appear under a Collections filter.
An All Media row always sits at the top, showing your total item count; clicking it clears the collection filter. Clicking a tag row selects just that tag (clicking it again clears it); Cmd/Ctrl+click a tag to add it to the selection instead of replacing it, so you can browse the union of several tags at once. While tags are loading, the sidebar shows placeholder skeleton rows. On narrower screens the sidebar becomes a horizontally scrollable chip bar with the same behavior.
Collections filter together with the facet chips above — selecting a collection and a facet narrows the grid to assets matching both.
If your store has Apple Photos shared albums synced, a panel next to Collections lists them with their last-synced time, any sync error, and a switch to pause an album’s hourly re-sync without removing it.
Adding assets
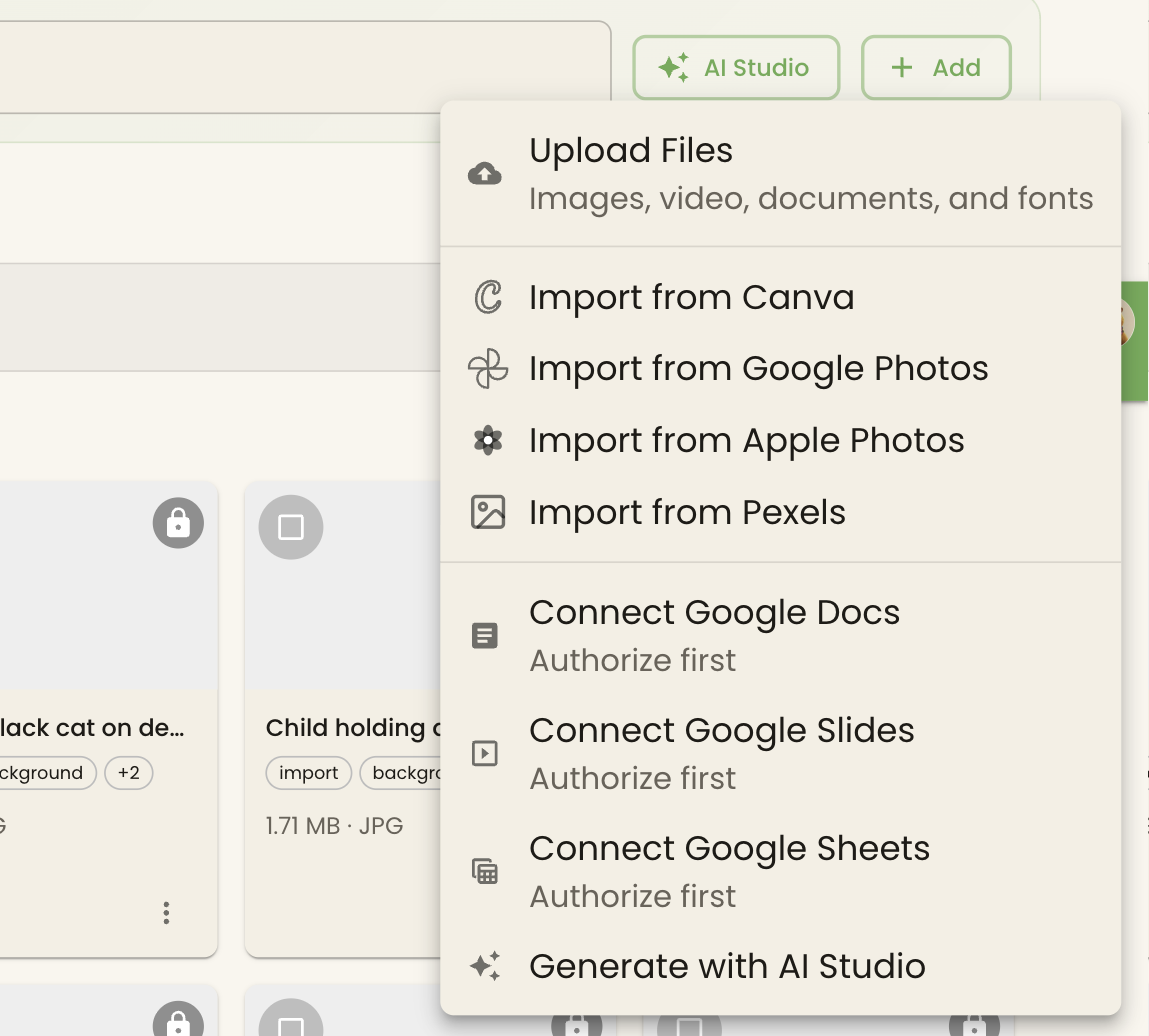
Section titled “Adding assets”Click Add to open a menu:
- Upload Files — opens a dialog you can drag files onto or click to browse. It accepts images, video, documents (PDF, Word, PowerPoint, Excel, OpenDocument formats, CSV), and font files (TTF, OTF) in one drop; each file routes to the right place automatically. Fonts don’t appear in this grid. They’re installed for your account and listed on the Fonts page.
- Import from Canva, Import from Google Photos, Import from Apple Photos, and Import from Pexels. See Canva, Google Photos, Apple Photos, and Pexels.
- Import from Google Docs / Google Slides / Google Sheets (or Connect Google Docs / etc. first, if you haven’t authorized that Google product yet) — opens Google’s file picker to choose a file from your Drive.
- Generate with AI Studio — opens the AI Studio panel to create a new image instead of uploading one.
See Images and Videos for upload formats and size limits.
Browsing and searching
Section titled “Browsing and searching”Toggle grid or table view, sort, and adjust density from the controls above the grid. A search box filters by file name. A Generate or find media with Twig… field above the grid takes a natural-language request — Twig can generate new media or help you find existing items.
The grid loads a page at a time; click Load more to fetch further items — there’s no fixed ceiling on how much it will show.
Inspecting an asset
Section titled “Inspecting an asset”Click any asset to open the inspection panel. It shows a full preview, technical details (dimensions, file size, MIME type, video duration, and — for AI-generated images — the model, prompt, and seed used), and any tags on the file. From here you can rename the file, edit its tags and alt text, replace the underlying file, and see its Usage — the content sources, pages, and displays that currently reference it.
A document’s settings (duration, fit, background, and — for a Google-imported file — its auto-refresh schedule) open from its own context menu (the ⋮ on its card) rather than this panel: View Details, Preview, Settings, Refresh now (Google-sourced files only), and Delete.
Bulk operations
Section titled “Bulk operations”Select assets with the checkboxes that appear on hover, or Select all the currently loaded items. A batch action bar appears with:
- Delete — permanently remove the selected files
- Add Tags — apply tags to the whole selection at once
- Remove Tags — strip tags from the whole selection
Bulk delete and bulk tagging apply to library items (images and video) in the selection; documents in a mixed selection are left alone.
Storage usage
Section titled “Storage usage”The command bar shows your total item count and how much storage you’re using against your plan’s limit. See AI credits and storage for how that limit is set and how to add more.
Tip: Google Workspace files (Docs, Slides, Sheets) can refresh automatically — changes you make in Google appear on your displays on the file’s own refresh schedule, or right away if you click Refresh now from its menu. You don’t need to re-import the file.